
This is the start of your Learning 2.0 program. From here, click on the links below, or you can simply scroll down.
Good luck and have fun!!
BiblioCommons Part 1, Part 2, Part 3
This is the start of your Learning 2.0 program. From here, click on the links below, or you can simply scroll down.
Good luck and have fun!!
BiblioCommons Part 1, Part 2, Part 3
Filed under Uncategorized
The initial set-up process should have given you an idea on how to make actual posts to your new blog. You should take the time to play around and learn how to upload media from your computer, sharing with other users and platforms, and what options are available to you.
What you need to to do is get acquatinted with your Dashboard. Your Dashboard is the central control for everything to do with your blog. This is where you can find the stats for how many hits your blog is getting, who is commenting on what, even what you have commented on in the past. You can draft new posts, publish them to the web, or edit old ones. Upload media, create content and manipulate various plug-ins for your blog from the dashboard. You can also alter the appearance of your blog and customize your theme template. It’s also your home base for keeping track of all the blogs you choose to follow. It can seem a little bit overwhelming at first, so just take a deep breath and dive into one option or tool at a time and explore the interface.
Why not reflect on your experience with WordPress as a blog post on your new blog? Did you find it easy to set up? What do you think you might use your blog for?
Filed under Uncategorized
Go back to your Facebook homepage. You may have to re-enter your username and password before you can back to your account home page. Once you do that, follow the steps on your home page and remember to tour your privacy settings;
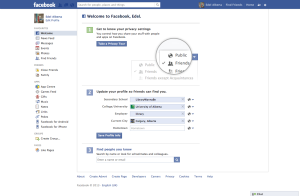
Facebook is known for it’s highly customizable privacy settings. The Facebook privacy settings Tutorial will explain how to control who can see your posts, what tags are and how they work, how to access privacy shortcuts, and sharing using apps, games and websites.
Facebook will prompt you to fill in some basic information to update your profile. The more information you provide, the easier for other people to find you. Go ahead and fill in the content you are comfortable sharing, remembering that this information might be visible even to people who are not on your Friends list.

Next, you will want to make your first Status Update. A status update is a compact sharing of content that can be viewed by your friends. You can share anything, from text describing your day or an experience, personal feelings, expressions of joy, pictures, video, links and entire files – your options are limitless. You can also choose to include tags, so other people will be notified you mentioned a post. You can manually select, or use GPS, to include a location so people can know where you posted from.
But for moment forget about all of that. Put your cursor in the Facebook Status box, and type a single line, introducing yourself to the world of Facebook, and click send.
Filed under Uncategorized
Facebook is a living, breathing creature that grows and changes as you add more posts, pictures, “like” media and groups, and start to participate in various conversations.
“Liking“: Your ‘newsfeed’ is a constantly updating string of posts that will take up the bulk of your Facebook homepage. This feed is generated from posts of friends, groups you belong to, and pages you have “liked.” You will notice an option to “like” every post you see in your news feed by clicking it, the poster will be then be notified that you ‘liked’ their contribution, and you will be notified if others contribute to that thread. If you “like” a Facebook Page, you will then begin to see posts from that page appear in your news feed. Facebook is smart enough to suggest pages for you to ‘like’ on the right hand side of the home screen. Facebook will also start to refine its suggestions based on your previous likes, and other information that you post to Facebook.
![]()
If you see something while you are surfing the internet that you want to share on your Facebook page and you see a Facebook logo, or a “like” option, this is a quick and easy way to share that information back on your Facebook page so your friends can see it, and share it with their friends too – and you don’t even have to leave the web page you are viewing to do it.
Sharing Your Pictures:

One of the most popular features on Facebook is the ability to share your photos with your friends. Use the “Add Photos/Video” option directly above your status box. Just click on it and upload either a single image, or a create an online photo album. Facebook will ask you to select a photo, or several photos from your computer or device. Select the photo, click ‘upload’ and then “post” it to Facebook. At this time, you can now add a caption, or a description of the photo. Useful tip for beginners: Many users want to dive in and start commenting, sharing and chatting with their friends, and that is great! It is important to keep in mind who you are sending a message to, and who you want to have see it. When you post a “comment” on something that someone else has posted, consider it like putting a note up on a public bulletin board, lots of people can see it. Facebook’s Messenger service is a function that has all the best qualities of e-mail, but the fluidity of live chat; this is the place to leave private messages and have private conversations. You can’t talk about Facebook without talking about privacy. No matter how you have set your privacy settings, it is wise to consider everything you do on Facebook to be open to the public. Imagine having your grandmother and a priest looking over your shoulder before you hit that ‘post’ button. http://www.youtube.com/watch?v=SCaKuAdKumA
Congratulations! You’ve completed the Facebook module.
Don’t forget to reflect on your experiences with Facebook on your WordPress blog.
Select a friend from your ‘friends list’ and look around their profile. Comment on a picture. Like a post that they shared. Try sending someone a personal message using Facebook Messenger, or having a live chat with them if they are online. Do you have a smart device, and are getting comfortable with the online version of Facebook? Try downloading the Facebook App, and see how taking the social network with you can change things. Blog about your experience.
100 Libraries to Follow on Facebook
Filed under Uncategorized
Storify is an online program which allows users to compile posts, tweets, status updates, videos, and many other types of social media into a sequential narrative. By combining these different pieces, it allows someone to create something new with those bits. It can be used to show a particular topic being presented through a diverse media lens, or it can be used to show a discussion thread as a means of telling a story. In libraries this is an effective tool for talking about an organization’s history using a range of sources. An example of this is with the Hunt Library in North Carolina State University, where the story of its existence is told through tweets, newspaper articles, and blog posts linked into a narrative. Storify can also be used to show the progress of a particular project; one example being Edmonton Journal writer Elise Stolte’s use of Storify to give a virtual tour of the new Jasper Place Branch as it was being constructed.
Other library-related uses for Storify can be to promote a library service with testimonials from different people. Another idea could be to present a successful program through a series of photos, Facebook posts from happy patrons, and a newspaper article about it.
 The easiest way to do this is to log in with your existing Twitter or Facebook account. You can also create a dedicated account by adding your name and Email address.
First of all, do you have an account with other social media sites? If you don’t, your best bet is to go get set up with them so you can have the best possible experience with Storify. If you do, then let’s proceed.
 Go to ‘Create Story’ to get started. On the left side you’ll see a blank canvas. On the right is a search bar with multiple sites, including Twitter, Facebook, Youtube, etc. You can customize that list by clicking on the ‘+’ next to them and adding others.
 One popular use of Storify is to show a sequence of tweets to tell a story. Click on the Twitter tab, type something into the search bar, and you will see a list of results. From there, drag the items you want over to the left side. Once you have pulled the items over, you can drag them up and down to adjust the sequence. You are also able to add text to provide background or commentary between items by using ‘Add Text’.
 Once you are finished and have saved your work, you are ready to publish. Simply click on the ‘Publish’ button at the top.
 Storify will prompt you to advertise your story on Twitter, Facebook, and whatever other social media you are using. Also, you can notify the people whose items you used in your story by having their pictures checked. Alternatively, you can un-check them to not notify.
 Now your story is published and you can view it in your profile. You have many options for sharing it on the left side, and you can also go in and edit your story at any time. As you can see, it’s very simple to create a story so why not give it a try. Once you’ve made and published something with Storify, blog about the experience and add the link so readers can check it out.
Storify VIP is the premium service of Storify. Unlike the basic version, this one is only available to media organizations and publishers. It has a number of advanced features such as live-blogging (posting about a live event and generating a story in real-time) and the ability for multiple editors to access a story.
Here’s a guided tour through Storify.
Rick Stoddart – Telling the Story of Your Library Services Using Storify – 2011 OVRS
Filed under Uncategorized

